
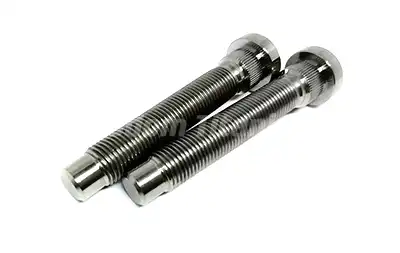
Press-in and screw-in titanium wheel studs both hold a wheel to the hub, but they work in different ways. A press-in stud sits in the hub through a knurled interference fit, so it suits hubs built for that fit and open rear access. A screw-in stud threads into a tapped hub hole, so it allows faster replacement and more custom lengths. Neither style is safer on its own. Grade 5 titanium (Ti-6Al-4V), correct fitment, clean threads, and controlled torque decide how well either design performs. Below, I compare strength, weight, installation, and sourcing for buyers.
How Press-In and Screw-In Titanium Wheel Studs Work?
Why the Installation Method Matters?
A wheel stud is like a spring-loaded clamp. When the lug nut is tightened, the stud moves a little, which pushes the wheel against the hub. It keeps the joint tight when you stop, turn, or jump hard. This stretch is called loading. The material, the state of the surface, the thread contact, and the lubrication all have an effect on the preload. It's more likely that the screw will wear out if the stud isn't tight in the hub or if the threads are broken. So, the way the screws are placed seems like a safety choice rather than a hardware choice to me. Everyone who sells things, races cars, or works on cars has to deal with this question.
How Press-In Studs Hold?
There is a knurled or splined part just below the head of a press-in stud. The knurl is a bit bigger than the hub hole, which is used to push it through. After that, the head fits against the hub lip. When the nut is tightened, it holds on to the metal and the pin can't turn. Most of the time, this design needs a support attachment, a controlled press, and a way to get to the hub from the back. It only works with hubs that were made to work with it because the bore size and knurl size are very accurate. It's not as important for the hub as it is for the screw because a worn or too big hole makes the grip weaker.
How Screw-In Studs Hold?
A hub hole that has been tapped can hold a screw-in stud. The lug nut is on the thread on the outside, and the load is on the thread on the hub side. You can use a tool to turn the stud on most of them because they have a hex, double-hex, or internal lock. In some cases, safety wire is added to race builds. The hub doesn't have to be pressed out, so it's faster to change a screw-in stud. You can also change the lengths and thread pitches to better suit your needs. The price to pay is thread condition. Not even preload is caused by threads that are dirty, broken, or bottomed out. The most important things are a clean hub hole and full engagement.
Titanium Wheel Stud Materials, Strength, and Weight
Grade 5 Titanium (Ti-6Al-4V)
Most studs are made of grade 5 titanium alloy. About 4% of it is vanadium and 6% is aluminum. ASTM B348 says that Grade 5 bar needs to have a tensile strength of at least 895 MPa and a yield strength of at least 825 MPa. Titanium has a density of 4.43 g/cm³, while steel has a density of 7.85 g/cm³. A titanium part that is the same size as a steel part weighs about 45 percent less. It can also resist rust and many road poisons. Our titanium wheel studs are made from Grade 5 (Ti-6Al-4V). They should all be able to show you a certificate of material that tells you what grade it is.
Titanium Versus Steel and Aluminum
Titanium is the best material sometimes. Class 12.9 steel fasteners have a nominal tensile strength of 1,200 MPa, which is higher than Grade 5 bar. Tensile strength of steel is about 200 GPa, while titanium's is about 114 GPa. If you put the same amount of weight on titanium, it will stretch more. That changes how the preload rises as you pull tighter. It's even lighter than steel (about 2.7 g/cm³), but it's not as strong and can't handle as much heat. Steel is in the middle. It's not as strong or heavy as steel or aluminum, but it's also not as light either. High-strength steel can win because it is cheaper, stronger, or just plain right.
Weight Savings, Galling, and Preload
The wheel studs are attached to the hub, so taking away one gram lowers the mass that is turning and not being sprung. It's very cheap to get 20 studs for a five-lug car. Buyers in bulk should not rely on what the catalog says, but instead ask for weights that have been tested. Titanium threads can gall, which means they stop up or tear, when they are pushed together. This type of anti-seize works better, but it also reduces friction. This means that the same force causes more preload. Follow the stud maker's torque number for threads that have been cleaned. Think about how hot the brakes are when you pick out the lug nut and end.
Advantages and Disadvantages of Each Design
Press-In Studs: Strengths and Limits
Press-in studs make it easy to connect parts because there are no hub-side threads to wear out. They hold well and don't turn when the nut is tightened if the bore, knurl, shoulder, and fit are all in check. They show up when you use the service. It can take longer to change a hub, a press, and taking the hub off. A broken knurl seat or a hole that is too big can't be fixed by adding a longer stud. titanium wheel studs that are pressed in only work with hubs that were made to fit them. This is because the hub's maker has already set the interference sizes, and hubs don't need to be changed very often. Shops that change studs a lot will have to wait a long time.
Screw-In Studs: Strengths and Limits
Screw-in screws make it easy to fix things. With the right drive tool, a tech can take one off and put a new one on without having to press. They come in different lengths, thread sizes, and head styles, which makes them useful for wide-body builds, race wheels, and spacers. They hold well if the hub thread is deep enough, the torque is high enough, and they are well oiled. The hub thread may wear out, the threads may cross, or the pin may bottom out. When wheels are changed a lot, threads wear out too. Because titanium galls, you need to be extra careful here. Every time you change the studs, check the hub holes.
Neither Design Is Safer by Default
I've heard that one form is a lot safer. Based on bolted-joint engineering, that's not a good idea. Some books, like John Bickford's work on bolted joints, say that the preload, fit, and installation control of a joint are the most important factors that determine how well it works. Failures usually happen because of things like a bad fit, broken threads, the wrong amount of pressure, impact tools, or too much force. It's not just the stud style. In the right hub, a well-made press-in stud is better than a screw-in stud that doesn't fit right. It works the other way too. Pick the type that works best with your hub. Distributors care more about making sure that all tens of thousands of pieces are the same size than about the name on the box.
Installation and Fitment Guide
Fitment Checklist and Thread Size
Just knowing that the stud is M12 or M14 is not enough. Check the thread pitch. It could be M12 x 1.5, M14 x 1.25, or M14 x 1.5. Also, look at how the hub engages, how long the lugs are, how much they stick out, the shape of the shoulder, and the style of the seat. You can use a thread gauge and calipers to measure things and then compare them to the car's paperwork or a drawing. What kind of lug nut is it? Is it a conical, circular, or flat seat, open or closed? The length you need will depend on the wheels, spacers, and brake room you have. When bolts are longer, the threads fit together better, but if they are too long, they can hit the brakes or walls. Send us a picture or word about a weird hub.
Installing Press-In Studs
Make sure the hub shaft is clean, free of rust, dirt, and burrs. Center the hub, line up the stud, and slowly press it down until the shoulder is against the hub all the way. If you hammer it in or use the lug nut to pull the stud into place, you could damage the knurl and the seat. Once the set is pressed together, make sure that each stud sticks out the same amount. This will keep the set level. Then make sure that none of the studs spin when you tighten the nut. It doesn't fit right if someone does. Measure the bore of a new stud.
Installing Screw-In Studs and Setting Torque
Before you start, look at the hub threads and pin threads. To cross-thread, put each screw in by hand first. Finally, use the correct drive tool to finish and stop before the pin hits the bottom. Don't use any other anti-seize than what the maker tells you to. A dry torque number can make a stud too tight because friction and preload change when something is oiled. Both the screw fitting torque and the lug nut torque should be checked. For tightening, use a calibrated torque wrench and move it in a star shape. Check again after the first time you drive or go to the track.
Inspection, Maintenance, and Buying from a Qualified Supplier
Inspection and Replacement Planning
Check the studs when the wheels are off. Watch out for cracks, screw-in interfaces that aren't tight enough, press-in studs that aren't fully set, studs that are swollen or bent, and threads that are galled. If that stud has damage, cross-threading, severe overheating, or what looks like overload, you should get a new one. Replacement times depend on miles driven, how often the wheels are changed, heat, hits, and the manufacturer's directions. Thus, there is no one number that works for all cars. Use the right drive to take off screw-in studs. For studs that you press in, use a controlled press. On either kind of pin, don't use an impact tool. Write down the batch number, the power steps, and the date of the check for each build.
Documents and Batch Control for Wholesale Buyers
It's most important to make sure that each batch is the same if you buy a lot of pieces. As well as material certificates like an MTC, lot or batch numbers, and proof of thread and size checks, you should ask for these things. Before you order a lot of them, try 20 to 50 pieces to see how much pull and torque they have. Then, ask technicians what they think. Write down how the seller handles making sure the finish is the same every time, packing, labeling, and refilling broken parts. People who look at the risk of a product often need test records, so make sure you ask early on. Because of these steps, a thread flaw or uneven hardness is less likely to lead to a big return.
What to Ask Wisdom Titanium?
Wisdom Titanium is in the Baoji Titanium Valley in Shaanxi Province, which is the largest titanium industry cluster in China. Sponge, ingots, bars, plates, tubes, and forgings made of titanium all start their journey here. Grade 5 titanium metal (Ti-6Al-4V) is used to make our titanium wheel studs. They have thread sizes like M12 x 1.5, M14 x 1.25, and M14 x 1.5, and you can cut them to any length you need. You can pick a finish that is polished, anodized, or something else. Tell us about your drawing, how many copies you need, and when they are due, and we'll go over them with you.
Conclusion
Titanium wheel studs can clamp a wheel well whether they are pressed in or screwed in, as long as the preload, fit, and fitting are all done correctly. Press-in designs have hubs that are made for them and a knurled interference fit. The hub threads on screw-in designs, on the other hand, make it easier to switch out parts and make different lengths. Titanium grade 5 is about 45% lighter than steel, and it doesn't rust. Class 12.9 steel, on the other hand, can be stronger than its tensile strength, and titanium needs to be cleaned and cared for so that it doesn't hurt. They are both not safer to use. The right thread size, pitch, stud length, lug nut seat, and torque are more important than the style. A lot of checks and records of each batch help keep things safe, and for people who buy in bulk, they make sure that the standard is the same for all of their orders.
FAQ
Is titanium stronger than steel for wheel studs?
Not all the time. That being said, class 12.9 steel is stronger than grade 5 titanium, even though grade 5 titanium is very light. Titanium is better than steel because it is lighter and doesn't rust.
Are screw-in studs better than press-in studs?
They all work as long as the hub is made for them. Pick the one that works best for your hub, how often you change your wheels, and how you like to take care of them.
Do titanium and steel studs use the same torque?
Not all the time. Different sizes, types of material, and how well the threads are oiled can all change the right number. Follow the power guidelines that the stud maker gives you.
How do I identify M12 or M14 fitment?
You can use a thread gauge and tools to measure the width and pitch. Then, use a picture to check your work. The only difference between M14 x 1.25 and M14 x 1.5 is their pitch.
When should I replace a wheel stud?
Get a new one right away if it cracks, bends, cross-threads, gets very hot, or looks like it's overloaded. Set times based on heat, miles, and how often the wheels need to be changed if not.
Request Titanium Wheel Studs Fitment Support from Wisdom Titanium
Wisdom Titanium makes titanium wheel studs and works with Grade 5 (Ti-6Al-4V) studs that have thread sizes of M12 x 1.5, M14 x 1.25, M14 x 1.5, and more. They can also be made to order in any length and finish, such as polished, anodized, or something else. Write to sales@wisdomtitanium.com about your hub, how many you need, and when you need them. Our staff will look at what you need and give you a quote. Wisdomtitanium.com has more information.
References
- ASM Handbook, Volume 2: Properties and Selection: Nonferrous Alloys and Special-Purpose Materials, ASM International, 1990
- Titanium: A Technical Guide, 2nd Edition, ASM International, 2000
- Materials Properties Handbook: Titanium Alloys, ASM International, 1994
- ASTM B348/B348M: Standard Specification for Titanium and Titanium Alloy Bars and Billets, ASTM International, 2019
- ISO 898-1: Mechanical Properties of Fasteners Made of Carbon Steel and Alloy Steel, Part 1: Bolts, Screws and Studs, ISO, 2013
- Introduction to the Design and Behavior of Bolted Joints, 4th Edition, CRC Press, 2007